
Tutorials
Patients, consultations and appointments in HomeopathyWorld
By Dr. Harish Kumar · September 12, 2026 · 8 min read
A step-by-step guide to the clinic side of HomeopathyWorld: patient records, the consultation timeline, recording outcomes and booking appointments.
The case simulator is where you practise. This part of HomeopathyWorld holds your real patients: what you saw at each visit, what you gave, what happened next and when they are due back. This guide covers the whole loop, from adding a patient to recording the outcome at follow-up.
First, a point that often confuses people. Practice cases in the AI case simulator are separate from your patient records. You can link a practice case to a patient, but it never becomes a consultation, never changes the case history and never counts as a visit. The clinical record is what you write in the consultations timeline.
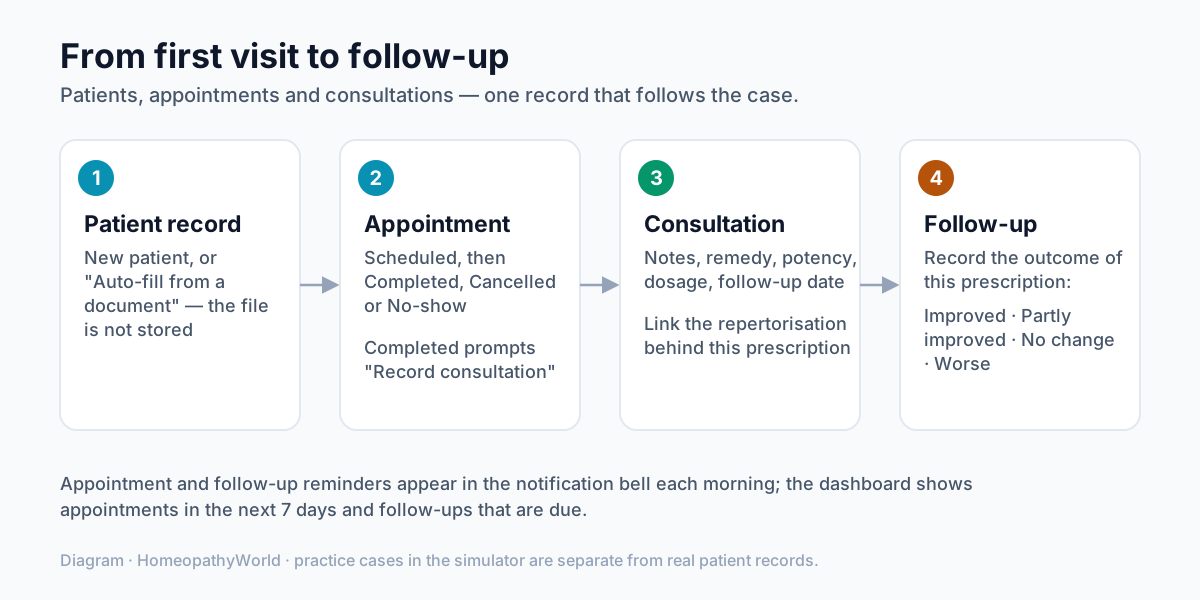
Diagram: how a patient's record, appointments and consultations fit together.
Before you start
- You need to be signed in. Patient's Records and Appointments appear in the sidebar for student and practitioner accounts.
- On the Free plan you can keep up to 10 patient records. When you reach the limit, the app tells you and suggests Practitioner Pro, which removes it. For current plans, see Settings → Billing.
- If you only use the clinic side, try Clinic mode, which hides the community and gamification. It is covered in Settings, privacy and security.
Step 1: Find your way around the patient list
Open Patient's Records from the sidebar. The page is headed Patients and shows how many patients are in your practice.
- The search box (Search by name, code, or city…) filters the list as you type.
- The sort menu offers Recently updated, Recently added and Name (A–Z).
- The list shows 20 patients per page. Once you have more, arrows let you move between pages.
Each patient gets a patient code when the record is created. It appears with a # beside the name, and you can search by it. It also appears on printouts.
Step 2: Add a new patient
Click New patient. The New Patient form has three sections.
- Basic Information: Full Name and Gender are required. The rest are optional: Date of Birth, Age (for when the date of birth is unknown), Mobile Number, Email, Occupation, City and State.
- Homeopathic Profile: Thermal State, Miasmatic Tendency and Constitutional Remedy. Leave the first two on Unknown until you have enough to judge.
- Case History: Chief Complaint, History of Presenting Illness, Past History, Family History, Allergies and Current Medications.
Click Create patient. You land on the new patient's page.
Auto-fill from a document
At the top of the New Patient form is a card called Auto-fill from a document. If the patient brings an old prescription, an intake form or a report, it can save you some typing.
- Click Upload document and choose a PDF or an image (JPG, PNG or WEBP) of up to 10 MB.
- Wait while the button shows Reading document….
- The card then says how many fields were filled and asks you to review them below. Check every filled field against the paper before you click Create patient. Nothing is saved until you do.
Worth knowing:
- It works best with typed or printed documents. Handwriting and poor photographs are harder to read.
- The file is processed by AI to read the details and is not stored.
- You can auto-fill up to 10 documents a day. The count resets at midnight India time.
- If nothing can be read, the card asks you to enter the details yourself.
Tip: auto-fill is a typing aid, not a case-taker. Treat whatever it fills as a draft, especially dates of birth and medicine names.
Step 3: Get to know the patient page
This is where you will spend most of your time. Across the top are four buttons: New Case, Edit, Print and Delete. Below them, the patient's details sit in four cards (Basic Details, Contact, Homeopathic Profile and Activity). Then comes the Case History, followed by three working sections: Appointments, Consultations and Practice Cases.
Delete asks you to confirm first. The patient is removed from your active list, and the app warns that this can't be undone from the app.
Step 4: Record a consultation
Each visit is one consultation. In the Consultations section, click Add consultation and fill in:
- Visit date (required; it defaults to today)
- Follow-up date
- Notes / observations
- Remedy, Potency and Dosage
Click Add consultation to save. The timeline lists the newest visit first, with the remedy, potency and dosage as a tag and the follow-up date beside it.
To change a visit, use the pencil icon. To delete one, click the bin icon and then Delete? to confirm. Deleting takes two clicks on purpose, because a visit note is part of the clinical record.
Link the repertorisation behind the prescription
If you repertorised before prescribing, link the analysis so the reasoning stays with the visit. In the consultation form, open Repertorisation behind this prescription and choose a saved analysis. Analyses already linked to this patient come first. Analyses not linked to anyone are marked "(not linked to a patient)".
Once you choose one, the form shows Prescribe from its ranking: followed by that analysis's top remedies. Click one to fill the Remedy field. In the timeline, the consultation then carries a From a repertorisation tag.
If the list is empty, save an analysis from the Repertory first. Repertorisation step by step shows how.
Record the outcome at follow-up
At the next visit, open the earlier consultation with the pencil icon. The edit form has one extra field, Outcome of this prescription, with the choices Not recorded yet, Improved, Partly improved, No change and Worse. The outcome stays in this patient's record and is never sent to usage statistics.
The outcome appears only when you edit a visit, not when you first add it. You cannot know the result on the day you prescribe.
Step 5: Link a practice case to a patient
Sometimes you want to rehearse a difficult case before the patient returns. New Case on the patient page opens Start a Case, and the practice session is linked to this patient. It then appears under Practice Cases. You can also link a case from inside the simulator with Link patient.
Remember that the simulated patient is not your patient. Whatever happens in that case stays in the simulator.
Step 6: Print the record
Click Print to open your browser's print dialog, where you can print or save as PDF. The printout includes the patient's details, the case history and every consultation, with a "Confidential patient record" footer. Appointments and practice cases are not included.
Step 7: Schedule appointments
Open Appointments from the sidebar and click New appointment.
- Patient: type in Search patients… and choose from the results.
- Date & time: required.
- Duration (min): set to 30 unless you change it.
- Reason and Notes: optional.
- Click Schedule.
Two shortcuts fill in the patient for you:
- Schedule appointment on the patient page.
- The calendar icon on a consultation that has a follow-up date (Schedule this follow-up). It fills in the patient and that date, with a 10:00 start you can change.
Appointments are listed under Upcoming and Past. Scheduled appointments have icons to Mark completed and Mark no-show, and every appointment can be edited or deleted. The four statuses are Scheduled, Completed, Cancelled and No-show. To set Cancelled, open Edit appointment and use the Status menu. Deleting an appointment does not touch the patient record or any consultation notes.
The "Visit completed" prompt
When you mark an appointment completed, a Visit completed box asks you to record the consultation while it is fresh. Click Record consultation and the patient page opens with the consultation form already started. The visit date is set to the day of the appointment, and the reason is copied into the notes. Once you save, the appointment shows Visit recorded.
If you click Later, nothing is lost. A completed appointment without a note keeps a small document icon (Record the consultation for this visit) so you can come back to it.
Step 8: Dashboard cards and daily reminders
Two dashboard cards keep the practice in view. Each appears only when it has something to show.
- Upcoming appointments lists scheduled appointments in the next 7 days, with View all.
- Follow-ups due lists consultations with a follow-up date up to 14 days before or after today. Overdue ones are flagged and counted. If an appointment already covers a follow-up, it shows Booked or Seen. The rest have a Schedule button.
Every morning the notification bell also brings an Upcoming appointment reminder for anything booked in the next 24 hours, and a Patient follow-up due reminder for follow-ups due today or tomorrow. These are controlled by the Reminders switch in Settings → Notifications. If you turn on push notifications, they can reach your phone as well.
Common mistakes
- Writing the visit in a practice case. Practice cases are for learning. The patient's record lives in Consultations.
- Never recording the outcome. Without it, a year from now you will not know which prescriptions worked. It takes a moment at the follow-up.
- Trusting auto-fill blindly. Review every field before Create patient.
- Clicking Later and forgetting. Look for the document icon on completed appointments, or check Follow-ups due on the dashboard.
Try it now
Open Patients and add one patient you are seeing this week. Then open Appointments and book their follow-up.
Next in this series
- Repertorisation step by step
- Settings, privacy and security
- On the clinical side of follow-ups: When the remedy fails: a checklist
Dr. Harish Kumar
Homeopath and founder of HomeopathyWorld. Writes on materia medica, case-taking, repertory and the Organon for students and practitioners.
Put this into practice
Repertorise these symptoms against the real Kent & Bönninghausen, read the full Materia Medica, and practise the case on an AI patient — free account, no card required.
Create your free accountMore in Tutorials
Discussion
Sign in to join the discussion.
No comments yet — start the conversation.