
Tutorials
Voice and languages in the case simulator
By Dr. Harish Kumar · September 12, 2026 · 7 min read
Take a case in one of eight Indian languages, hear the patient's replies read aloud, or hold a spoken consultation and correct what the microphone heard.
Most patients in an Indian OPD do not describe their complaints in textbook English. They talk in Hindi, Marathi, Tamil or a mix of languages, and they will not wait while you type. The case simulator lets you practise that side of case taking. You can take a case in one of eight languages, have the patient's replies read aloud, dictate your questions, or hold a spoken consultation.
This guide shows where each setting is, how voice works during a case, and how the language you choose affects your score.
Before you start
- Eight case languages. English, Hindi, Marathi, Tamil, Telugu, Kannada, Bengali and Gujarati.
- A microphone is needed for dictation and live voice. Your browser asks for permission the first time you use it.
- Headphones help. With speakers, the patient's voice can be picked up again by your own microphone.
- Scoring depends on the language. English cases get a Practice score. Cases in the other seven languages get feedback without a number until scoring in that language has been validated.
Step 1: Set your defaults in Settings
- Open Settings and choose AI & Voice. The card describes it as "Default language and voice narration for the case simulator".
- Under Default case language, pick the language new cases should start in.
- Switch on Voice narration on by default if you want the patient's replies read aloud in every new case.
- Click Save preferences. You will see "Preferences saved."
Your default case language also matters for class work. When you start an assignment from the Your classes panel on the Cases page, the case runs in this language. Set it before you press Start.
Step 2: Choose the language for one case
- On the Cases page, click New Case.
- In the Start a Case dialog, look under Language. Each option shows the language in its own script, with the English name underneath. Your default is already selected.
- Pick a language. Choose Learning or Exam under Mode, then choose a case under Choose a Scenario.
If the case is not in English, the case header shows the language name on wider screens.
The language is fixed once the case starts
The language is saved with the case when it starts and cannot be changed after that. The patient's replies, narration, dictation and live voice all use it. To practise the same case in another language, start a new case in that language. It counts as a new case: on the free plan you can start 3 new cases a day.
Step 3: Narration: hear the patient's replies
Narration reads the patient's replies aloud using the voices built into your browser and device.
- The speaker button in the case header turns narration on and off. Hover over it and it reads "Turn on patient voice (TTS)" or "Turn off patient voice (TTS)". Turning it off stops a reply mid-sentence.
- While narration is on, each patient reply has a Replay button so you can hear the answer again.
- The simulator picks a voice that matches the case language if your device has one. How natural it sounds depends on the voices installed, so try a short case before you rely on it.
Narration only reads the replies. You still ask your questions by typing or dictating them.
Step 4: Dictation: speak into the message box
Next to the message box is a microphone button with the tooltip "Speak your question".
- Click it and ask your question aloud.
- Your words appear in the message box, in the case language.
- Read them, correct anything that was misheard, and press send.
Nothing is sent until you press send. If your browser does not support this, the button is greyed out and reads "Voice input not supported in this browser".
Step 5: Live voice: Speak with the patient
Live voice is a spoken consultation. You speak, the patient answers aloud, and both sides are written into the transcript.
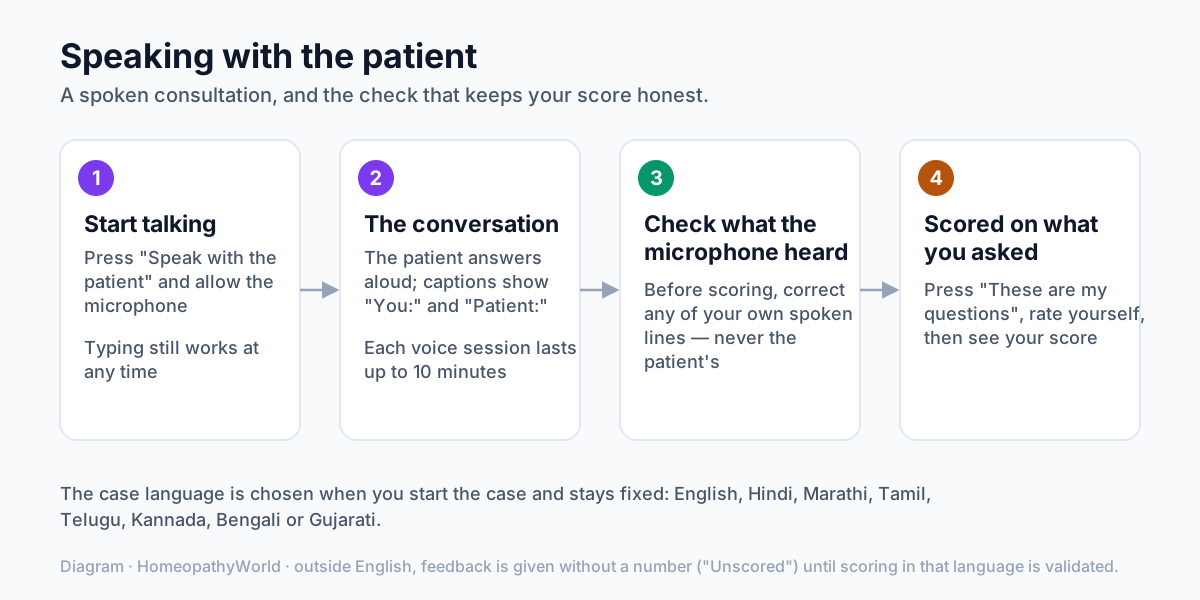
Diagram: a spoken consultation and the transcript check before scoring.
- Above the message box, click Speak with the patient. Beside it you will see "Live voice · typing still works".
- If your browser asks for the microphone, allow it.
- The panel shows "Connecting…" and then "Listening", with the time left. One voice session lasts up to 10 minutes. At an exam station it also ends when the station clock runs out.
- Speak naturally and pause for the answer. While you talk, captions marked You: and Patient: show what is being heard.
- Each finished exchange is saved into the case transcript.
- Click End voice when you have finished. You can start another voice session later in the same case.
You can type at any point. That helps with a question that includes an awkward remedy name; after it, go back to speaking. If the connection drops or the session reaches its time limit, you see a short message, such as "The voice session reached its time limit. Start it again, or keep typing." The case carries on as normal. Leaving the page also ends the voice session.
Each case has a limit on how much AI it can use. If voice will not start and you see "This case has used its AI budget. Prescribe from what you have gathered, or start a new case.", the case has reached that limit.
If the microphone is blocked
If you refused microphone permission, or the browser cannot reach your microphone, clicking Speak with the patient shows: "The microphone is not available. Allow it in the browser, or keep typing." Voice does not start, and the case carries on in text. To fix it, allow the microphone for this site in your browser's site settings, then click Speak with the patient again.
Step 6: Check what the microphone heard
Speech recognition makes mistakes, especially with remedy names and regional words, and your score is based on the questions you asked. So before a spoken case is scored, you can correct the record.
- When you prescribe, or when time runs out at a station, any spoken questions you have not yet confirmed are shown in a panel titled Check what the microphone heard.
- Your spoken lines appear as Spoken question 1, Spoken question 2 and so on, each in an editable box.
- Correct any words it got wrong. You can only correct your own spoken lines. The patient's replies cannot be changed.
- Click These are my questions to carry on, or Back to return to the case.
After this you rate your own work, and then the case is scored.
Tip: correct what the microphone got wrong, and nothing more. Do not add questions you never asked. In a class, your faculty see both versions. Next to your correction, the transcript notes what the microphone heard, and the review counts how many spoken questions you corrected.
How language affects your score
- English: you get a Practice score out of 100. It is a learning aid, not an official grade.
- Hindi, Marathi, Tamil, Telugu, Kannada, Bengali and Gujarati: scoring in these languages has not been validated yet. You get feedback but no number, and the score card reads Feedback · unscored. In your case journal these cases show as "Feedback only".
- A class case your faculty signed off: if a faculty member signs off a case in one of these languages, the score they give is shown.
This will change one language at a time, as scoring in each is checked against faculty marking. Until then, use English cases when you want a number to track. Use the other languages to practise the conversation itself.
Tips
- Short questions work best for live voice and dictation. Ask one thing at a time, as you would with an anxious patient.
- Type the Latin names. Microphones often mishear remedy names. Type those questions, or fix them at the check step.
- Take the history aloud even when you prescribe in writing. The consultation is spoken, but rubrics and the prescription are still chosen in the analysis panel.
- Set the language before class work. An assignment uses your default case language, and a station clock cannot be paused while you change it.
Try it now
Set your defaults in AI & Voice settings. Then open the case simulator and start a learning-mode case in the language your patients speak. Click Speak with the patient and take the first five minutes of the history out loud.
Next in this series
Dr. Harish Kumar
Homeopath and founder of HomeopathyWorld. Writes on materia medica, case-taking, repertory and the Organon for students and practitioners.
Put this into practice
Repertorise these symptoms against the real Kent & Bönninghausen, read the full Materia Medica, and practise the case on an AI patient — free account, no card required.
Create your free accountMore in Tutorials
Discussion
Sign in to join the discussion.
No comments yet — start the conversation.